...Together....we can, and we will make SRK a Zombie
 :wink_smil
  using Photoshop CS 2(any version of photoshop would do with none or minor changes)
--
Before we start, just a small point... When I say use a "softer brush", i mean when selecting for the brush reduce the " hardness....better to 0% or 4-5%
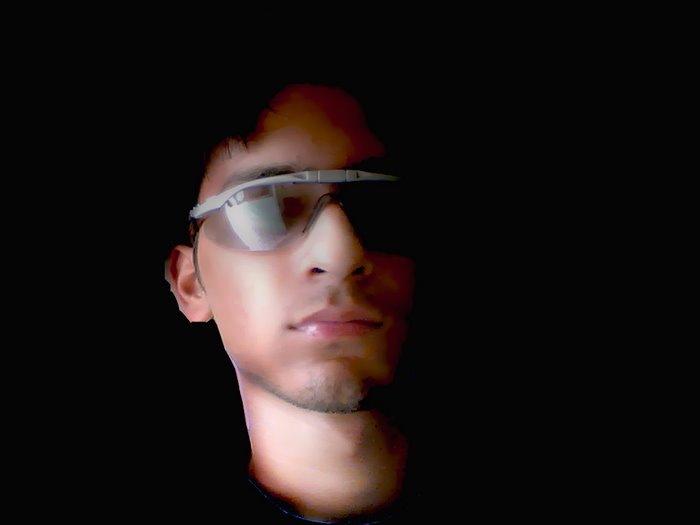
So , first we need a stock image....hmm....let this be the one

In the layers pallete, double click the layer's name to rename, and rename it to anything..say "Shahrukh original"

Too bright , too reddish.... So before we do something about it, press "Ctrl+J" to duplicate the layer. Its always good practice to make new changes on new layers. So you can discard the changes if something's wrong by just deleting the layer.. Ok now we are on "Shahrukh Original copy" layer..
Press "Ctrl U", and reduce the saturation

The pic will be less vibrant now

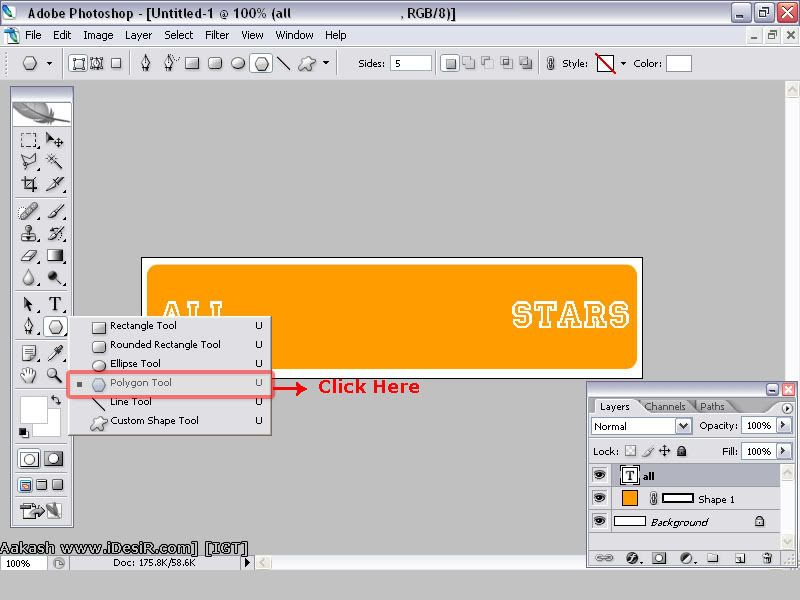
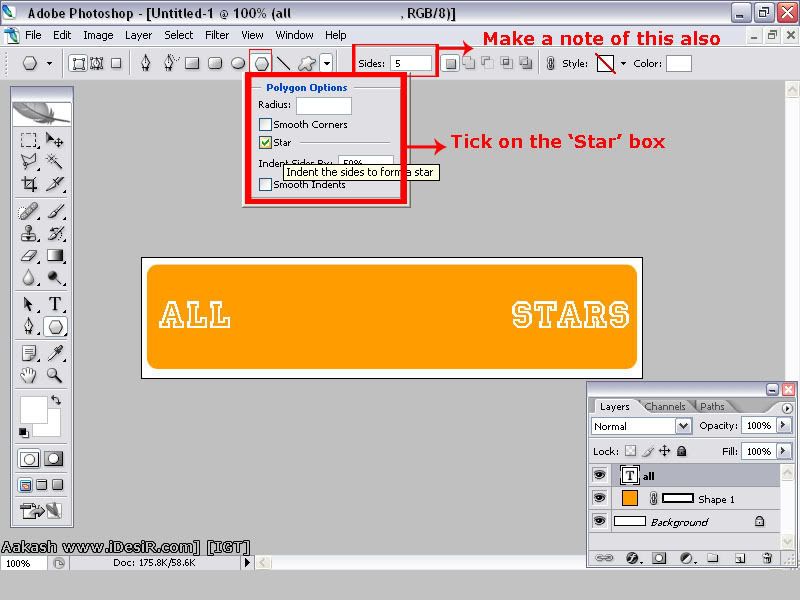
Still he looks like CineStar SRK.. Something should be done about that... Ok, select the "Burn tool"

Now select a soft brush

And now, make few brush strokes (just make it dark enough ..dont go overboard) on the parts of face I marked with Red

Now its more like it

Ok
Now its time to take some drastic steps.... We need a rough textured image to do the next step... The pic i selected is

Open it in Photoshop.. Press "Ctrl+A" to select all. Press "Ctrl+C" to copy..Then go to the Shahrukh's window we are working on and press "Ctrl+V"..
Now reduce the opacity of the pasted texture, so that you could get the SRK's pic as a reference. It doesnt matter how much opacity is reduced, coz its just temporary to get reference ...

Now select eraser tool.. Select a big SOFT brush and delete any part of texture falling on SRK's hairs, clothes and the wall behind. Also with a small brush , erase the texture falling on SRK's eyes... And increase the opacity of textured layer back to 100%...And change its blending mode to "Overlay"...Voilaaaa.... the evil SRK is very evident now...... But we are not finished now..

Now select the Brush tool, and with a soft brush, about the size of SRK's pupil.. And select a reddish color

Now create a new layer, by pressing "Shift+Ctrl+Alt+N" or "Layer-->New-->Layer".. Make sure this layer is above the textured layer. Now with the brush make red spots over SRK's eyes

Ok, now change the blending mode of this layer to "Color" .. Now you can see the devil's eyes :boxing:

Not evil enough?????? Well Okieee..... Find a rotten broken skull and open it in Photoshop..Here's what i selected

Now in the same way as the texture, select all, copy , paste it on the SRK's window..Here make sure this image (the layer the image is in, in the layer palette) is just below the texture layer.. If its not, then in layer palette drag the skull's layer below the texture's layer....

Now similarly as the texture layer, reduce the opacity , to see SRK's pic for refrence... Now this skull image maybe bigger or not in correct angle for our requirement.. So press "Ctrl+t".. A box would appear around.. Dragging corner points while pressing "Shift" will change the size proportionally.. Make sure the size of skull gets to the size of skull SRK may have .. Move the skull, and align the teeth of the skull with SRK's lips.. When its done , press the tick mark in toolbar (in Photoshop)..Now angle of the skull's image is also not matching SRK's face angle. So goto "Edit-->Transform-->Rotate", and again the box would appear..rotate it a bit to align with the face.. And press the tick mark to confirm...
Andddddd...Dont care the part of skull going outside SRK's face.. We are not concerned with complete skull anyway

Now pick the Eraser tool again. Select a soft medium sized brush, and start Erasing parts of skull..leave the teeth and the dark blackish broken part of cheeck bone..erase the rest.. and Change the opacity back to 100%.. If you dont succeed at first, press undo and try again...And try to make the image look somewhat like this

Ok the teeth is too yellow... We need to reduce the yellowishness.... So press "Ctrl+U" and select yellow...and reduce the "saturation" to about "-75%"..Lowering yellow's saturation will also blend the teeth with rest of the face

YAYYY!!!! SRK has finally turned into a Zombie... Hehehehehehe

Now the red background doesnt create the environment...So select a dark background.. I selected a "Graveyard" ...

Open the image in Photoshop. Now in SRK's window, press "W" to select magic wand, and with "tolerance" (in the toolbar) of about 40%, click on the wall.. It'll select the wall.. Press "Ctrl+Shift+I", to select SRK... Now goto Edit-> "Copy Merged".. Now go back to graveyard iamge and paste (Ctrl+V) zombie SRK on it.. Place it well...And we have a dark zombie...SRK...


If you liked the tutorial, and learned something from it, I'll be presenting more tutorials for you ppl... If you have any problem implementing any step, i m here to help...

P.S : Dont ever, and I mean EVER, try to convert your Girlfriend's pic to a zombie.. It is injurious to Health and Life....