Ever wondered how people got buttons looking like they were made of glass? Well this tutorial will take you through the process of how to create and edit buttons like that. Once you have finished this tutorial your button should look similar to this:

- Open up Adobe Photoshop and create a new page, for this tutorial I have gone for a 170 x 50 pixel page, but its up to you what size depending on how big you want your button to be.
- Click on the 'Paint bucket' tool and set your foreground colour, and fill your page in with your desired colour. Next choose another foreground colour and select the 'Rounded Rectangle tool'. Now left click and drag on the page to create your shape.
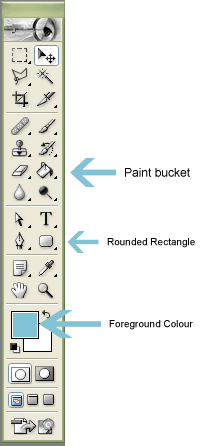
- Now its time to add the effects to your shape. Right click on the 'Shape layer' and select blending options and the layer style window should appear. Now select 'Inner Shadow' from the left hand column and put these settings in:
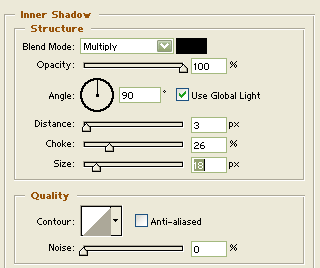
Now click on 'Inner Glow' from the left hand side column
- While on the 'Inner Glow' section put these settings in:
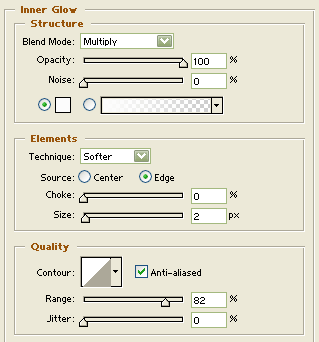
Next click on 'Bevel and emboss' on the left hand column.
- While on the 'Bevel and emboss' section put these settings in:
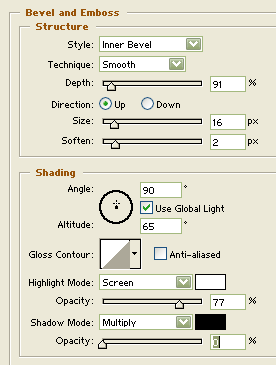
After you have done that click on 'Contour' from the left (Nearly done Woohoo!)
- While on the 'Contour' section put these settings in

- Now press ok and your done :-)
If when you have finished your button you decide that the colours don’t look right, then you can adjust these by going to Layer > Change layer content > Hue & Saturation and ticking 'Colorize' and moving the bars to change colour.
Ta Da, now you have a spiffy looking glass button to add that extra bit of style to any bland website, but remember folks, don’t go overboard with it.



1 comment:
Its vry gud. If u dnt mind, can u tel me wer find job vacencies 4 animators?
Post a Comment