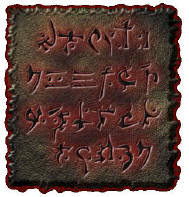
A cool effect in Photoshop you can create is a rune effect. There is absolutely nothing like the creepy, glowing text on a piece of rock that can be used better suited to adorn some artwork.
The following image represents what you will have created after completing this tutorial:

[runes]
Steps to Create Effect
The following steps will help you to create the image effect you see above:
- Fire up Photoshop and create a new image. Mine is 500x500px and transparent. Once that's done you will need a rock texture. Naturally, one is provided for those who don't wish to make it. Credit to phong.com for the rock effect.
- Alright. To turn this rock into a tablet, take the marquee (selection) tool (press M) and make a selection about the same size as you want your final tablet to be. Once that's done, go into the channels panel and create a new channel ("Alpha 1")
- Press alt+backspace to fill the selection with white (the foreground colour) and then go filters | blur | gaussian blur by about 4 pixels. Press ctrl+d to deselect and then press ctrl+f to repeat the last command (gaussian blur). Finally, go image | adjust | levels and move the sliders around (close together) until you get a nice smooth, crisp edge.
- ctrl+click on the channel "Alpha 1" and go back to the layers tab to bring up the selection. Press Q to enter QuickMask mode. Go filters | pixelate | crystallize for the crystallize filter. Press Q again to leave quick mask, then ctrl+shift+i to invert the selection and press delete.

- You should note that all of the screenshots in this tutorial have been scaled down in size to maintain clarity and cohesiveness.
-
-
Outer Glow - Blend mode: Screen,
-
Opacity: 48
-
Noise: 0 Solid Red (#FF0000),
-
Technique: Softer
-
Spread: 4, Size: 13
-
Contour: Gaussian (The one like an "S")
-
Range: 50
-
Jitter: 0.
-
Bevel And Emboss - Style: Inner Bevel
-
Technique: Chisel Soft
-
Depth: 650
-
Direction: up
-
Size: 15
-
Soften: 3
-
Angle: 135
-
Altitude: 51
-
Gloss Contour: Ring - Double (two waves)
-
Highlight mode: Screen (white, #FFFFFF) 75
-
Shadow Mode: Multiply (Black, #000000) 7
-
Contour - Contour: Half Round (outward/upward curve) 50.
Your picture should look like the following:

[ rock with a glow effect ]

[ tablet with text ]

[ zoomed in portion to highlight the engraving effect ]
-
- Finally, drag the text layer above the two "engraving" layers, and the tablet below all the layers. Now, to finish off apply the following to the text layer:
- Outer Glow - Opacity: 60, Noise: 0, Solid Red(#FF0000), Technique: softer, spread: 1, size 40, Contour: Half round (outward/upward curve), Range: 100, Jitter 0.
- Inner Glow - Opacity: 24, Noise: 0, Solid Red(#FF0000), Technique: softer, Source: edge, Choke: 0, Size 3, Contour: Half round (outward/upward curve), Range: 8, Jitter 0.
- Bevel And Emboss - Style: Pillow Emboss, Technique: Chisel Hard, Depth: 100, Direction: up, Size: 3, Soften: 0, Angle: 135, Altitude: 51, Gloss Contour: Linear (plain), Highlight mode: Screen (light grey, #B2AFAF) 75, Shadow Mode: Multiply (Dark Grey, #1C1C1C) 75.
- Contour - Contour: Linear (plain) 100.
- Texture - Bubbly Texture, Scale: 100, Depth: +100. Satin - Blend Mode: Multiply (black, #000000), Opacity: 50, Angle: 19, Distance: 11, Size: 14, Contour: Gaussian (The one like an "S") Inverted. Colour Overlay - Blend Mode: Normal (Dark Grey #1B1A1A) Opacity: 100.
- Outer Glow - Opacity: 60, Noise: 0, Solid Red(#FF0000), Technique: softer, spread: 1, size 40, Contour: Half round (outward/upward curve), Range: 100, Jitter 0.
There you have it - a brilliant rune effect. If you need any help, please post comments
Thankzzzzzz


No comments:
Post a Comment